
Installing OpenCV in Windows 7 / 8 32 Bit OS using Visual Studio 2010 / 2012
Know how to earn through Cloud computing without investing anything, without doing any work.
- This tutorial is only for 32 bit machines. If you have 64 bit OS then follow this link.Know how to earn through Cloud computing without investing anything, without doing any work.
Shopping FREE of Cost :) (Without doing any work)
Notes-
- Simplest way of OpenCV Tutorial follow this link. (For 32 bit OS)
Requirements-
1. OpenCV-2.4.7
2. Cmake
3. Visual Studio 2010 / 2012
4. Windows 7 / 8
Thanks to Hongbo Miao for this tutorial to install OpenCV 2.4.4 for Visual Studio 2012.
Important Note- After downloading and extracting OpenCV, delete the folder named "x64" inside "build" folder. Then go ahead.
Step-1
Extract OpenCV-2.4.7.exe to a folder let "C:/OpenCV". This OpenCV folder should contain many folders like build, include etc.
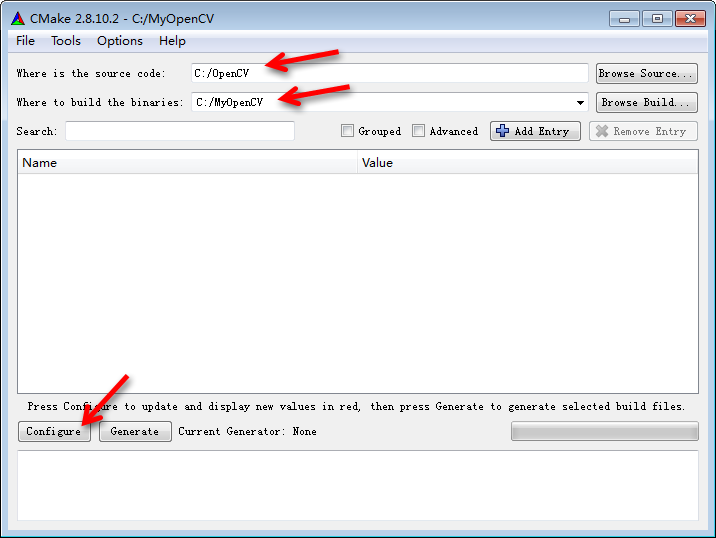
Choose Visual Studio 11 otherwise choose Visual Studio 10. Click Finish.
After getting red output, click Configure again. Wait a moment and then click Generate.
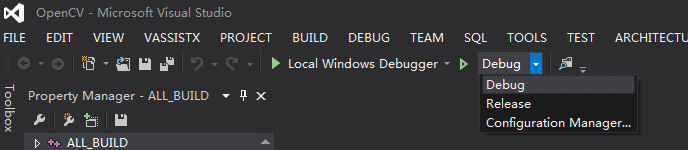
Close CMake and go to C:\MyOpenCV, open OpenCV.sln.
Choose Debug. (or By default it will be Debug)
Right click on INSTALL. And choose Build.
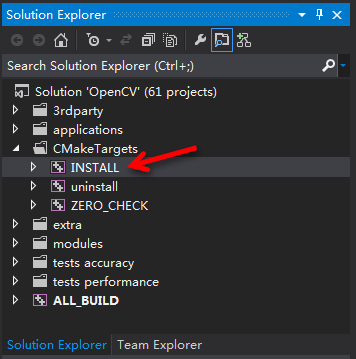
After build successful , go back and choose Release. Similarly, right click on INSTALL. And choose Build.
After build finish, close Visual Studio 2012.
Copy C:\MyOpenCV\install folder to C:\OpenCV. (This install folder contains your whole OpenCV, so there is no need of keeping folders other than install folder.)
So now you have a C:\OpenCV\install folder. You can delete C:\MyOpenCV whole folder if you want.
Step-2
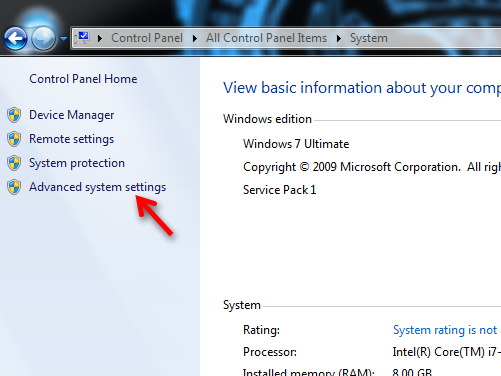
Open Windows Explorer. Click on Computer and then System properties.
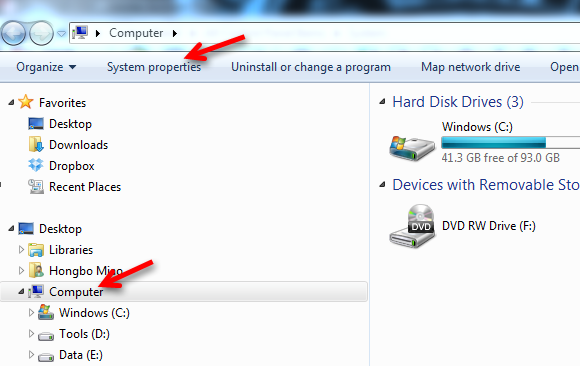
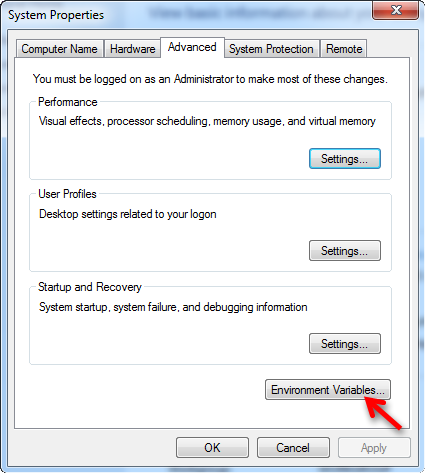
Choose Advanced system settings.
Click Environment Variables...
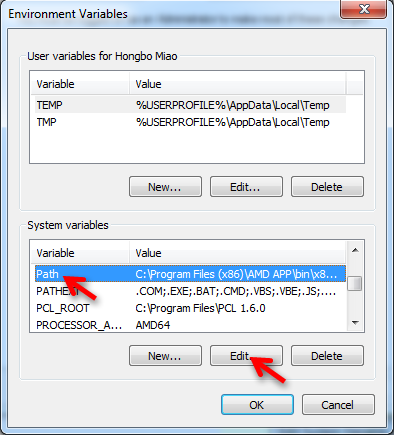
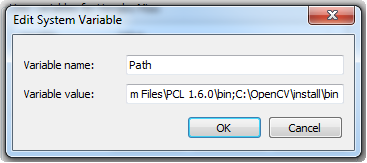
Add only this to Environment Variables -> System variables -> Path
C:\OpenCV\install\bin
Step-3
For Release:
Create a new empty C++ project.
View -> Property Manager or right click on project name inside solution Explorer and choose property.
Double click Release
- C/C++ -> General -> Additional Include Directories for 2012 or VC++ Directories -> include directories for 2010, add
C:\OpenCV\install\include\opencv
C:\OpenCV\install\include
- Linker -> General -> Additional Library Directories
C:\OpenCV\install\lib
- Linker -> Input -> Additional Dependencies
opencv_calib3d247.libopencv_contrib247.libopencv_core247.libopencv_features2d247.libopencv_flann247.libopencv_gpu247.libopencv_highgui247.libopencv_imgproc247.libopencv_legacy247.libopencv_ml247.libopencv_nonfree247.libopencv_objdetect247.libopencv_photo247.libopencv_stitching247.libopencv_ts247.libopencv_video247.libopencv_videostab247.lib
For Debug:
View -> Property Manager
Double click Debug
- C/C++ -> General -> Additional Include Directories
C:\OpenCV\install\include\opencvC:\OpenCV\install\include
- Linker -> General -> Additional Library Directories
C:\OpenCV\install\lib
- Linker -> Input -> Additional Dependencies
opencv_calib3d247d.libopencv_contrib247d.libopencv_core247d.libopencv_features2d247d.libopencv_flann247d.libopencv_gpu247d.libopencv_highgui247d.libopencv_imgproc247d.libopencv_legacy247d.libopencv_ml247d.libopencv_nonfree247d.libopencv_objdetect247d.libopencv_photo247d.libopencv_stitching247d.libopencv_ts247d.libopencv_video247d.libopencv_videostab247d.lib
Note the file names has extra "d" which means debug
and its over...
Note- Now restart the system and run the below program for testing.
Please share some experience on why to use OPEN CV/ MATLAB /C / C++!!!
Sample code:
//Reading an image
#include "opencv2\core\core.hpp"
#include "opencv2\highgui\highgui.hpp"
#include "cv.h"
#include "highgui.h"
#include "opencv2\highgui\highgui.hpp"
#include "cv.h"
#include "highgui.h"
using namespace std;
using namespace cv;
void main()
{
Mat image = imread("00.jpg"); //Give the full path to the image file
namedWindow("mywin");
imshow("mywin", image);
waitKey(0);
}
Sample code:
//Playing Video
#include "cv.h"
#include "opencv2\core\core.hpp"
#include "opencv2\highgui\highgui.hpp"
#include "opencv2\highgui\highgui.hpp"
#include "highgui.h"
using namespace cv;
int main()
{
// Open the video file
VideoCapture capture("asmall.avi"); //Give the full path for the video file
// check if video successfully opened
if (!capture.isOpened())
return 1;
// Get the frame rate
bool stop(false);
Mat frame; // current video frame
namedWindow("Extracted Frame");
// Delay between each frame in ms
// corresponds to video frame rate
// for all frames in video
while (!stop) {
// read next frame if any
if (!capture.read(frame))
break;
imshow("Extracted Frame",frame);
// introduce a delay in mili-second
waitKey(50);
}
// Close the video file.
// Not required since called by destructor
capture.release();
return 0;
}
After Successfully installed comment below. So that I can keep on updating my blog.
Important apps for Android
STOP AUTORUN of APPS in ANDROID
Important apps for Android
STOP AUTORUN of APPS in ANDROID
This comment has been removed by the author.
ReplyDeleteWow, thanks mate! You really help me! :D
ReplyDeleteBtw do you know how to install cvBlobslib or cvBlob on OpenCV 2.4.5 with Microsoft Visual Studio 2012 x64?
Thanks a lot, i haven't tested it yet but i think that it would be great if you add an example for the testing, other then that this is awesome.
ReplyDeleteHmm OK I will give a simple code to read and display an image... Thanks for the comment.
DeleteSample code for playing video and showing an image is given.
Deletelove the tutorial. however on the samples. its kinda hard to compare. the default code on my compiler has this
ReplyDelete// OpenCvTest.cpp : Defines the entry point for the console application.
//
#include "stdafx.h"
int _tmain(int argc, _TCHAR* argv[])
{
return 0;
}
but the sample you gave does not contain it. im using visual studio 2010 x64 bit OS.
i think this sample would be a help.its a code for displaying image. i got this from a blog of Jepson's also discussing how to install but using the old version of OpenCV. i tested it and it worked. thanks for the tutorial. i could've have done it.
ReplyDelete#include "stdafx.h"
#include
#include
#include
int _tmain(int argc, _TCHAR* argv[])
{
IplImage *img = cvLoadImage("D:\\funny.jpg");
cvNamedWindow("OpenCV",1);
cvShowImage("OpenCV",img);
cvWaitKey(0);
cvDestroyWindow("OpenCV ");
cvReleaseImage(&img);
return 0;
}
here is the link :http://jepsonsblog.blogspot.com/2012/07/installation-guide-opencv-24-with.html.
go to the bottom part of the page
Thanks for the comment.
DeleteThe code you have given is an out dated one. Use the sample given above. The syntax are more easier and the function names are related to Matlab like functions.
Deletei did everything u told sir.... but still not able to get the results. the program u put as example is also no t wrking.it is telling " unable to start program C:\users\anil\Documents\Visual studio 2012\Projects\anil2\x64\Release\anil2.exe" or even Debug on place of release. please help me out sir.
DeleteCheck if you have 32bit OS. If not follow the tutorial for 64bit OS. Install the updates of VS12 (update 2 and 3). It looks like a VS 12 problem not opencv.
DeleteHi, I followed your steps to install opencv for VS2012. I keep getting this error once everything has been done.
ReplyDeleteError 1 error C1083: Cannot open include file: 'opencv2\core\core.hpp': No such file or directory
This is for 32bit.
There is a path problem. Please double check the path you have given. Follow the steps carefully.
DeleteThanks a lot! The installation tutorial from the OpenCV website got me confused and had me figuring out for hours, your tutorial is great and easy to follow! though i had some trouble running the sample code for displaying an image because of my unfamiliarity with C++ but finally got it working.
ReplyDeleteThanks!
Thanks for let me know. My blog really helps.
DeleteHi Ansuman,
ReplyDeleteThanks for this wonderful tutorial. I seem to be encountering the same error as that of JP Talusan.
Additionally, I would also like to mention that the directories you have included - C:\OpenCV\install\include\opencv, C:\OpenCV\install\include, C:\OpenCV\install\lib etc. in the tutorial seem to be in different places for me (I am using OpenCV 2.4.5). The required files for me are at - C:\opencv\include\opencv, C:\opencv\include and C:\opencv\build\x64\vc11\lib respectively. Apparently I don't have the folder 'install'. I changed the directories accordingly when copying them to visual studio. Is this the right thing to do ?
Thanks for your time.
Just download OpenCV from " http://adf.ly/P0Kc7 ". Extract it to specified paths as above in step-2. It will work fine.
DeleteI have given new link which contain the install folder. Please download that. Extract it in C drive. Then follow from Step 2.
ReplyDeleteFor more information and a good tutorial I have written. Please follow "http://adf.ly/RBCdf".
Deletehello,
Deletethanks for your reply. none of the short links are working though..
Please visit my other post. That may help you.
DeleteWhich link is not working?
Please specify so that I can check.
All the adf.ly links are working in my knowledge.
or your internet service provider has blocked it.
can you please put a tutorial for installing openframeworks .
ReplyDeleteSorry I am not using that.
DeleteThis comment has been removed by the author.
ReplyDeleteTnx a lot!!!
ReplyDeletetow things i have to comment:
1) restart your computer after adding Environment Variables!
without it, the program will not be running.
2) you have to fix above opencv_core2453.lib to opencv_core245.lib (2453 => 245) in fild Linker -> Input -> Additional Dependencies for release.
Tnx again, it's the first guideline that are Clear and successful.
Thanks for the reply. Thanks for identifying the mistake. I will add the restart part.
DeleteCorrected.
You are great!
DeleteOhh Thanx...
Deletei am getting an error...
ReplyDelete"Unable to start program 'C:\users\hai\documents\visual studio 2012\projects\rockk\x64\Debug\rockk.exe'
The system cannot find the file specified"
please help me to solve this problem. asap :-)
Re-insatll your VS 2012.
Deletei am getting the same error as Deepak Bigbang. please help me out with some solution.
DeleteCheck if you have 32bit OS. If not follow the tutorial for 64bit OS. Install the updates of VS12 (update 2 and 3). It looks like a VS 12 problem not opencv.
DeleteHey I am getting a Cmake Error.It says
ReplyDeleteCMake Error: The source directory "C:/OpenCV" does not appear to contain CMakeLists.txt
hey Solved the issue , a rookie mistake :)
DeleteI had created another folder called "OpenCV" in which "opencv" folder was present .
So in CMake i had to give "C:/OpenCV/opencv"
Thanks
OK. Gud.
Deletehi thanxs a lot .. ur post helped me a lot to install nd execute my first opencv program..
ReplyDeletebut i have a problem.Whenever i start a new C++ project,the directory paths and libraries i added in the properties of my first program no longer exist.So do i need to add them everytime i create a new program or is it that i did any mistake while installing.(But one satisfying thing is that after adding paths,the program runs fine :) )
Yes you need to add paths, every time u create a new project.
Delete